Greenwood Public Library Blogs
  • At-Home with the Studio
  • Books & More
  • News
  • Kids Korner
  • TeenHQ
  • Director’s Desk
  • GPL Home

Tag Archives: amber p.

At Home with The Studio: Rock Crafts

Posted on August 7, 2020 by GPL

Lately, I have been obsessed with the idea of rock painting. There are so many cute ideas on Pinterest!

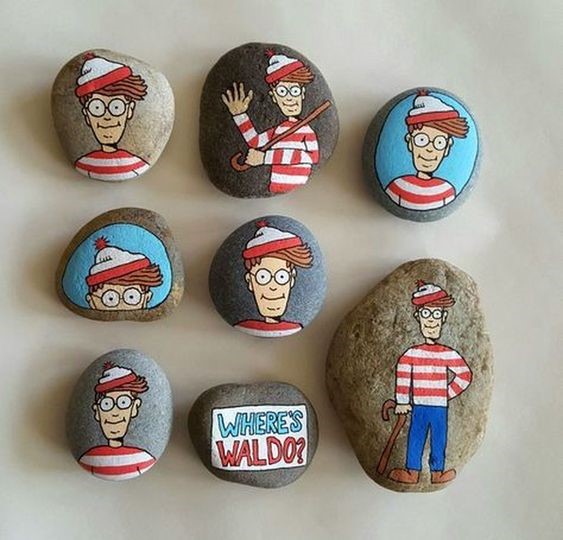
One of my favorites is the idea to paint Waldo on a rock. You could then hide him somewhere in the yard and do a real-life Where’s Waldo? game!


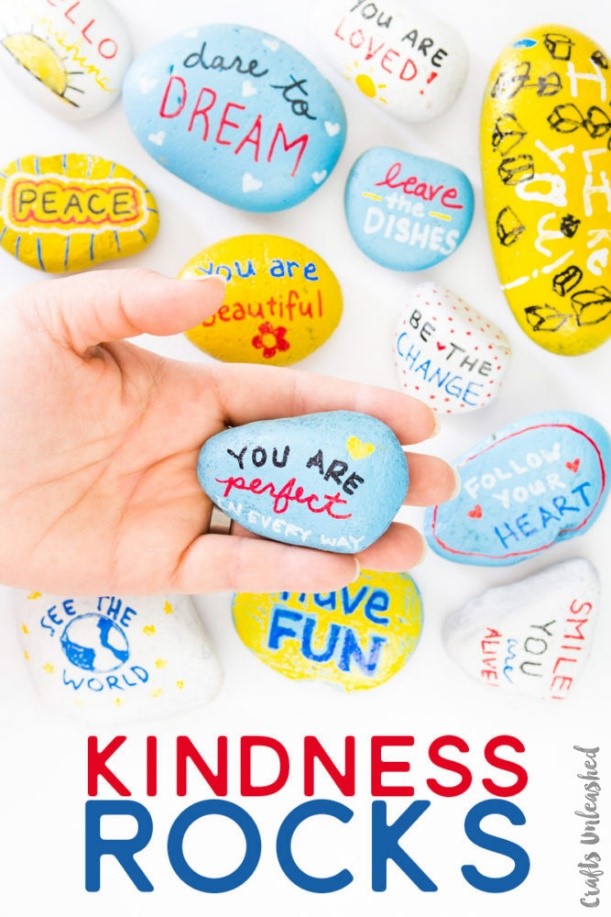
I also love these Kindness Rocks from Crafts Unleashed. After painting them with happy messages, they hid them at a park and playground for others to find. What a nice way to spread a little anonymous kindness.


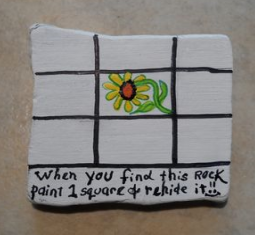
Lastly, I think this one is a super fun idea from Mary Brio Rose. Take a rock and paint section dividers and then hide it. As people find it, they will fill in another square and hide it themselves. I think it’s so nice to think of a rock as travelling along and making people smile. Who knows where it would end up?

All of these ideas are really great ways to take a craft and use it to have fun with people you know, or to brighten a stranger’s day, both of which are wonderful ideas in this strange time.

I’ve created a Studio rock art Pinterest board, which includes the above, as well as some other really fun rock painting ideas. Stay crafty!

Posted in At-Home with the Studio | Tags: amber p., crafts, rocks, The Studio | Leave a comment |

The Studio at Home: Beaded Safety Pins

Posted on July 10, 2020 by GPL

We have started a weekly video series called “Studio Sessions,” which is posted on our social media channels every Saturday. In it, I either feature a craft you can do at home or delve more deeply into the kits we have available for use in The Studio. Last week, I taught you how to make beaded safety pins (watch it here if you missed it!).

In the video, I used a pattern I designed of a tulip.


It is super easy to make your own patterns for beaded safety pins. Just test out the safety pins you have around and see how many seed beads fit on them. For my pattern, I used 1” safety pins. I could get 10 beads on each, and could comfortably get 7 safety pins across. You could use graph paper and simply color in the pattern until you get something you like. Or, if you prefer to use the computer like me, you can use Excel to draft your pattern. I changed the column width to 2 and turned on inside and outside borders. Then, I used the paint bucket tool to fill in the pattern. This was an easy, no mess way to keep adjusting the pattern as I went along until I got something I liked.

If you’re not feeling up to designing your own, there are lots of patterns already out there! I’ve created a Pinterest board of patterns and inspirational ideas to help get you started.

If you need information on the mechanics of putting together your own beaded safety pin, the Studio Sessions video below will walk you through it.

Happy crafting!

Posted in At-Home with the Studio | Tags: amber p., crafts, The Studio | Leave a comment |

The Studio At Home: Make and Takes now available curbside!

Posted on May 28, 2020 by GPL

As you may have heard, we are now offering curbside service! We are excited to announce that The Studio is also getting in on the curbside act.

Each week, we are offering a different kit with the materials you need to make a fun craft.

This week, you can pick up a kit to make your own rainbow with popsicle sticks and foam. Next week, we will have a kit to make friendship bracelets with a cardboard loom available. It’s a really easy way to get started with friendship bracelet making. It doesn’t require fancy knots or patterns, and you end up with a really neat bracelet.

If you’d like to request a kit, just let us know when you call in for curbside service.

If you’re curious about the craft of the week, just check The Studio webpage, which will includes a picture of the finished craft.

Our webpage also includes links to some GPL Pinterest boards with inspiration for kids, adults, and DIY games. We hope these ideas keep you making while you’re at home.

We look forward to seeing what you make! Post your finished projects on Instagram with #GPLStudioAtHome


Posted in At-Home with the Studio | Tags: amber p., crafts, The Studio | Leave a comment |

At Home with The Studio: How to Make Paper Flowers

Posted on May 14, 2020 by GPL

I love the idea of fresh bouquets, but I don’t like that they often fade quickly and that you have to remember to change the water. Paper flowers solve both of those problems! I’ve had a great time creating some different looks with paper flowers to make a cheerful bouquet.

These are very simple to achieve, and don’t require much in the way of supplies.


Materials needed:

  • Construction paper in 2-3 colors
  • Glue or glue stick
  • Scissors
  • Paper straw
  • Hot glue gun and glue
  • Hole punch


Directions:

  1. Cut 5-6 identical hearts out of the main color you’d like your flowers to be. Five is enough, but 6 will give you a fuller look.
  2. Cut the same number of smaller hearts out of your secondary color.
  3. Cut out a small circle. If you are only using 2 colors, I would suggest making this the same color as your smaller hearts. If you’re using a third color, use it for your circle. I have a circle punch that is just right for this (about 1”), but you could also trace the lid of a glue stick, and it would be the perfect size.
  4. Glue your smaller hearts onto the bigger hearts. Line up the creases at the top.
    Tip: If you traced your hearts on the paper before you cut them out, make sure to put the side with the pencil marks on the bottom.
  5. Use your hole punch to make a hole near the bottom point of each heart. Make sure to not get it too close to the edge, because you don’t want it to rip.
  6. Test your flower by fanning your hearts out while making sure that all of the holes you punched line up. If you feel like you need more or fewer hearts to get your desired look, you can add or remove as needed at this point.
  7. Put down one of your hearts. Then put a small amount of glue on the bottom of just one side of another heart. Place it on top of the first heart at the angle you want. Continue to do this until you get all the way around.

    Tip: Make sure you only put glue on the underside of the hearts – if you try gluing on the top, any extra glue will really show as it dries. Try to keep the glue only in the space where the arrow is in the above picture. Also, keep checking to make sure that your holes are lined up!
  8. On the final one, you will need to put a small amount of glue on both sides of the heart’s underside.
  9. Place your flower upside down on the table. Place your straw in the hole and hold it flush to the table. Use hot glue to glue around the base of the straw to hold it in place. This will keep the straw from poking through too far at the top.
  10. Once dry, flip your flower over and use another small ring of hot glue around the outside of the straw. Stick your small circle on it.
  11. You’re done!


There are a lot of variations you can do with this! In the picture below. I used identical hearts and did everything exactly the same until step 5 – when I switched to punching the holes at the top of the heart. I then followed the rest of the directions exactly. This gives you spikier looking flower, and a kind of swirl effect in the middle.

You can also do it with just one color for the petals, and a second color for the circle, like the light blue one in the picture below.

Or, you can switch to gluing the smaller hearts to line up with the bottom points of the heart, like the pink and yellow one above.

These are really fun and fast to make! I hope you enjoy it enough to try out a few variations and make yourself a whole bouquet.


Posted in At-Home with the Studio | Tags: amber p., crafts, The Studio | Leave a comment |

At Home with The Studio: How to Make Pop-Up Cards

Posted on April 30, 2020 by GPL

We’ve missed creating new things with you at The Studio! Since we cannot host programs or provide make-and-take projects at this time, we wanted to share a DIY that you can make with supplies that you likely already have around the house. 

Since Mother’s Day is only a week and half away, and Father’s Day is not long after that, we thought we’d share how to make a homemade pop-up card. 

This card is almost infinitely customizable, so don’t limit your ideas to just your mothers and fathers! These would be a great idea to send to friends to connect with them while we are all sheltering at home, or to celebrate any milestone you want.   

You only need a few supplies to get started. 

Materials needed: 

  • 2 pieces of heavy construction paper or cardstock
  • Small pieces of various colors of paper, depending on your theme
  • Markers, crayons, or glitter pens (whatever you prefer for writing your message)
  • Pencil
  • Glue or glue stick
  • Scissors
  • Ruler
  • Stickers (optional)

Directions:

Plan what items you would like to have pop up from the card. You could draw hearts, balloons, gift boxes, animals – you name it! You might even want to start with a silly pun like we did (You’re whale-y awesome, I love you a latte, You’re dino-mite, Thank you berry much, etc.) and use that to decide what item you’d like to have pop up. If you’re not comfortable drawing or creating freehand shapes, you could even put stickers on a piece of construction paper or cardstock and then cut around it. Once you’ve decided, cut your shapes out of the small pieces of paper, and color if you wish.

Take the piece of paper that you want to be the inside of the card. Measure your card and your pieces.

You want to make sure that any lines you use to cut will be small enough to be covered by your design, and also that you don’t cut so deep that your design will hang over the edge of the card when it’s folded up.

Here, we put small lines that would fit within our design, and then used a ruler to draw lines straight out from there. To get a more dimensional effect, we made the lines for the dinosaur 1” long and the lines for the volcano ¾” long. This will make the dinosaur look closer when you open the card.

Push the cut areas forward and crease.

Open the card and glue your item to the bottom half of the cut piece. Repeat as needed.

To add even more dimension to this one, we added a decorative cut to a piece of green construction paper and folded it over. Just glue down the flat piece.  Add your message.

This leaves you with a card that has notches in it, so to cover that up, use your second larger piece of construction paper to glue to the outside. Make sure you don’t put glue on the pop-up pieces!

Decorate the front in coordinating items and add your inscription on the inside. 


Here are a couple of other cards we made using the same method.  


There are a lot of other ways to make pop-up cards that would also be fun to try. One easy way is to cut out 4 of the same size and shape items and layer them by just gluing in the crease. 

We also made a simple and fun card by tracing a child’s hands onto construction paper and cutting them out. Then we cut a strip of construction paper, folded it accordion style, and then put one letter per fold, so the final card reads “I love you this much.” 

For more pop-up card inspirations, visit our Pinterest Pop-Up Card Inspiration board! 

Posted in At-Home with the Studio | Tags: amber p., crafts, pop-up cards, studio | Leave a comment |

Book Ratings

5 stars - All time favorite
4 stars - A must read
3 stars - Good, not great
2 stars - Not my style
1 star - Epic fail

Popular Tags

#gpltalk amber p. Anna R. Anne G. Aubrey W. book list book review carissa s Carissa S. childrens christmas crafts digital resources Emily E. fantasy fiction graphic novel historical historical fiction hoopla humor janet b Jane W. Jessica S. Katherine R. kids literary fiction magical realism movies mystery non-fiction nonfiction Pam A. podcast Rachel J. recommendations retelling romance Sheila H. steam Susan J. teen The Studio thriller Valerie H.

Archives

CyberChimps WordPress Themes

© Greenwood Public Library Blogs